Showing posts sorted by relevance for query washing. Sort by date Show all posts

Sunday 28 July 2013

Washing Quilts - In Praise of the Colour Catcher

You may have noticed that lately my blogging has not been as prolific, and that I may not have had the chance to comment and respond to your kind comments.  Apologies. My excuse is that I have been busy completing my Red and White Pinwheel Quilt ready for the deadline for the NEC Festival of Quilts, which is being held in Birmingham on 8th-11th August 2013.Besides being time consuming, and having to quilt on the hottest day of the year, there have been a few other traumas along the way which I though I would share with you. 
 
As you may know, for marking this quilt I have been using the blue Wipe Off Fabric Marker, to draw on my quilting lines.  I have  found it really successful, and would use it again.  However, to start with, I was removing the blue pen marks as I went along, which was fine until I realised a problem.
 
I am not *stupid*.  When I made the decision to make a red and white quilt, the first thing I made sure of was that I gave the red solid I was going to use, a good 60 degree wash, to make sure that the colours would not run. However, somewhere along the way, I completed the top and put the sandwich together, using  a lovely red spotty fabric, and started quilting.  My eye may have been off the ball at the time, as we were building a house.  It was not until quite far along the quilting process, when I was removing the blue Wipe Off Fabric Marker with a very damp cloth, that I noticed that the water had caused the dye from the red spotty backing fabric to bleed onto the white of my quilt ..... take a deep breath
 
Red dye bleeding onto white fabric Colour Catcher
Red dye bleeding onto white fabric
It was difficult to proceed with my quilting until I knew for sure that when the quilt was finished it would be a Red and White Pinwheel Quilt, not a Pink and White Pinwheel Quilt. Luckily, I still had some of the backing fabric spare, and I decided to do a test run.

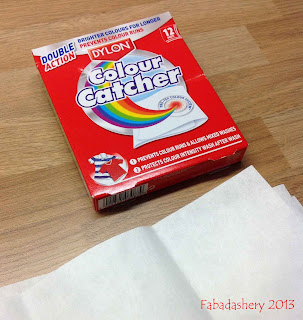
Dylon Colour Catcher
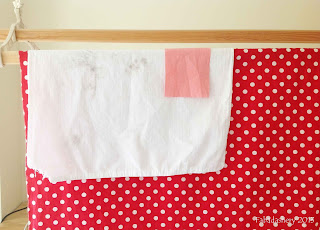
I put some yardage of the spotty red fabric, an old white pillowcase, and a Dylon Colour Catcher sheet in the washing machine on a warm wash, and waited for the results.  As you can see it all worked out perfectly.  Yes, the colour did run, but the Colour Catcher did the trick of collecting the loose dye particles. 

Washing Quilts - Colour Catcher Test Run
Quilting of the Red and White Pinwheel Quilt continued right up to the deadline, but before it was packaged up and delivered, it had to be washed.  Even with the test I had done, and the results plainly in front of my eyes, somewhere inside of me still had some doubts, and I had reservations about this moment. A few days before, I noticed a comment by Karen at Celebrate Hand Quilting about washing quilts, and I contacted her for some reassurance. Thanks Karen for your advice, at the right time! 

The quilt went in the washer on a COLD WASH, with NO detergent, with FIVE Colour Catchers.  At this point I still had the blue markings on the quilt, and I needed to rinse them away, without detergent, which worked a treat.  Within a few minutes, with the loose red dye, it looked like a bloodbath in the washing machine, and I could see that all the Colour Catchers had taken up a lot of dye ... take a deep breath.   

So I drained the first round of water off, replaced the Colour Catchers with FIVE MORE, and started the process again.  There was a lot less red dye in this wash, but the Colour Catchers still took up a lot of red, as you can see from my final collection of Colour Catcher sheets drying on the sink in the laundry room.  Once this was rinsed, I finally did a wash with some detergent in it, and THREE Colour Catchers in it.  By this point I had moved onto a different packet of Colour Catchers, and I found that Dr Magic Snatch a Dye, which I purchased from Lidl, works just as well.

Red and White Pinwheel Quilt drying on the Sheila Maid
As you can see  - the final results show a Red and VERY White Pinwheel Quilt, which I am very pleased with. During all this time, my husband has been thoughtfully searching for Red and White Pinwheel Quilts on Ebay - just in case.
I never really had an interest in Chemistry when I was at school, but I would like to thank  all the Chemists that were involved in the development of this wonderful product - the Colour Catcher.

Tuesday 23 July 2013

Hand Quilting in Hot Weather ....

Red and White Pinwheel Quilt, 2013 Tour de France
For the record, we have got really warm hot weather here in the UK at the moment, about 32 degrees. Perfect weather for quilting ....  Lately, I have been using every spare moment of my time hand quilting.  Thank goodness I have had the company of the Tour de France, for the past few weeks.  The exhibition deadline is getting close, but I feel as if I am on track with what I need to do, with just a few hurdles to push through.

Washing the Butterfly Quilt
The last time we had hot weather like this was 2006.  I was hand quilting my Butterfly Quilt, and I can remember sitting underneath it in very hot weather, again working towards a deadline.  I have come to the conclusion, that if we are to guarantee hot summers, I need to have a big quilting project on the go.  Anyway, whilst the weather has been hot, I have taken the opportunity to wash some of my quilts, as they are drying in no time.

Sparky the Cat lazing in the sun.
Otherwise, it is just too hot to do anything but snooze, especially if you are wearing a fur coat

Saturday 17 November 2012

#2 Butterfly Quilt - Techniques and Construction


Butterfly Quilt English Piecing Blocks
English Paper Piecing the Butterfly Quilt

Construction
The Butterfly Quilt was hand pieced, using the English Paper Piecing Method.  This involves tacking each piece of fabric over a paper template, to give it shape and structure, and then sewing the pieces together.  I tend to leave all the paper in until the top is complete, again, to keep its structure.  I find that this method leaves me with a dead flat top at the end. 

This was a great project.  I spent hours playing with fabrics from my stash and choosing the colour combinations.  It was a great portable project too.  I used my train journey to work to cover paper templates and piece blocks, and it went on many car journeys, as well as holidays to Amsterdam, France and the USA.  This is where all the action took place, and without a fuss, quietly the blocks came together. Once the blocks were together I decided it needed a border to frame it.  I pieced 2.5” x ¾” strips together out of the scraps, and that made up the border, along with calico borders. In a large quilt like this, don’t underestimate how long it will take to remove the paper templates!  For the back of the quilt, I used the same cream calico as on the front.
 
Before I put the sandwich together I needed to add the 64 antennae. The antennae of the butterflies are hand embroidered, using a backstitch, in a regular stranded embroidery cotton.

The wadding in the middle is 100% polyester.  All I remember about it is that I wanted one piece of wadding, and with the large quilt, my choices were limited.  I had also previously had a BAD experience hand quilting cotton wadding, which ‘bearded’ on a navy background, so I knew I wanted to give that a wide berth.  Having used the quilt daily for several years, I still really like the feel of it.
Quilting
When it came to the quilting, I knew I wanted to hand quilt it, but I didn’t know where to start.  As the top gradually came together, I knew I had to do something about it, so I booked onto a
Sandie Lush Hand Quilting Workshop, at Busy Bees, in Newport. That was a brilliant class, and I left with the confidence to start quilting the Butterflies Quilt.  I didn’t know what to quilt on it, so I made up my own pattern (not without MUCH deliberation), having outlined the butterflies, and ‘stitched in the ditch’ of their bodies.  I remember quilting this quilt quite distinctly. It was July and August in 2006.  It was HOT.  And I was underneath a quilt, hand quilting.  I was quilting to a deadline – I had entered it into the NEC Festival of Quilts in Birmingham, so it had to be done, ready for delivery in August.  Without the deadline, I think I would have done more quilting on it. 
Butterfly Block Scrap Quilt
Example of Butterfly Quilt Block
Once complete, I washed it in the washing machine.  I had been dragging this quilt around with me everywhere for a couple of years.  The cat had regularly sat on it whilst I quilted, and the heat of the summer meant that more recently, it had taken the brunt of my perspiration.  It washed up a treat on a 40 degree wash, and luckily the sun remained out long enough for it to dry outside on the washing line. However, almost immediately, it was packed up and taken to the depot where they were collecting the quilts for the show.  I was missing it already.
Further information about the Inspiration Behind the Butterfly Quilt can be seen in earlier posts.

Sunday 21 April 2013

Hand Quilting - Wipe Off Fabric Marker

I have been enjoying doing my Nearly Insane Quilt blocks far too much lately, and felt that I needed to spend some time on hand quilting my red and white pinwheel quilt.  I have got a self-imposed deadline for completing it, which is approaching fast.
Having completed the outlining, I am now quilting the motif in the centre of each square.  I designed the motif myself and made a template out of some heavy plastic to draw around, several months ago. For the first one I had used a watercolour pencil, but having watched a video tutorial by Judi Madsen at Green Fairy Quilts, I thought I would try a Sew Easy Wipe Off Fine Line Fabric Marker to mark the quilting pattern.

Sew Easy Wipe Off Fabric Marker Pen
The idea of drawing in pen on my nice, white quilt, filled me with apprehension, so I have documented it, mainly to remind myself how it went for my own future reference.  Drawing the pattern on was easy enough, as the tip of the pen is really fine - good accuracy. I can never guarantee how long a hand quilting project will take, it maybe years, so I am only doing one motif at a time, as I am not sure how long the pen will last.
Motif marked onto quilt with Fabric Marker Pen
Once I had hand quilted the motif, I dampened a microfibre cloth, and wiped the marks away.  As you can see below, yes, it really did wipe the blue pen marks away! Just like magic!

Wiping off Fabric Marker Pen, with a microfibre cloth
However, when I looked again the following day, I noticed that there were some blue stains lingering, mainly at the points where I stopped the pen when drawing around the quilt template. 
Remaining blue stains, after 12 hours
I have given it another rub, and it seems to have got rid of the lingering blue stains, and I will check it again before I give it its final wash.  I don't want to rub the quilt too much though.  I guess until I finish the quilt, and  give it a good wash, I am not going to know for sure whether it has worked or not.

Here are the instructions for reference.

Instructions:
All Fabric Markers should be pre-tested on a scrap of your fabric first, for both application and removal.
All temporary markings must be removed before ironing or washing in detergent. Avoid direct sunlight or heat.
To remove marks, simply wipe off with a damp cloth, or rinse out in cold water.

Friday 2 August 2013

BIG FINISH - Red and White Pinwheel Quilt, Hand Pieced, Hand Quilted


Red and White Pinwheel Quilt - Hand Pieced, Hand Quilted
Well, here at Fabadashery it is not often you get to see a BIG FINISH like you will today.  Usually you have to satisfy yourself with the little 6 inch Nearly Insane blocks that I am working through.  But my efforts of recent weeks have paid off, and I have completed my Red and White Pinwheel Quilt, in spite of the little trauma of washing it. 

Completed - Red and White Pinwheel Patchwork Quilt
It is a single bed quilt, hand pieced and hand quilted. I devised the design myself, with the assistance of my Electric Quilt software, and inspiration from antique quilts on the internet.  I love the look of red and white quilts like this, and would have loved to have seen the American Folk Art Museum exhibition: Infinite Variety, Three Centuries of Red and White Quilts, but it was just too far away, but I have downloaded the App onto my iPAD, and now I have my very own.

Back - Red and White Pinwheel Quilt
The backing is a piece of red spotty Laura Ashley fabric which has been in my stash for years.  I started the quilting at the beginning of this year, and it was completed 26th July 2013, (having an exhibition deadline definitely helps to get this sort of thing done....)


I probably started making the little pinwheels at the end of 2009, as I remember it being my hand piecing project whilst we were building our house.  The top was complete by January 2011, and the sandwich put together ready for quilting.  Having known this quilt for so long, there are a few things I may have done differently, and it is by no means perfect, but it is a finished quilt!  Anyway, no sooner had I stitched the last few stitches, and the quilt had to be packaged away for delivery to the NEC for the Festival of Quilts.  There were a few disappointed cats in the house, as they have been waiting, and waiting to test it out, but that will have to wait.

If you are heading off to the Festival of Quilts at the NEC in Birmingham 8th-11th August 2013, you can see my quilt among the Traditional Quilts section, No:660.  I can't wait to see it there!
  
Statistics
Dimensions: 150cm x 190cm (approx)
Piecing Method: English Paper Piecing. Hand Pieced
Quilting Method: Hand Quilted
Dates: 2009 – July 2013
Joining up with Sarah, Crazy Mom and Feline Friday today!